Nothing to Disclose
Good morning love bugs!!!
Let me ask you a couple questions. Do you have dry cuticles? Are they hard to manage? I do! Back when all I used to post about is polish, I know for a fact swatching multiple polishes can wreak havoc on ones cuticles. Acetone is drying and not good to have on your skin or nails for long periods of time. Over the years I have tried multiple cuticle creams and oils to help keep my cuticles at bay and while some worked okay, this one is by far my favorite.
Whats even worse is when you neglect your nails and don't paint them or take care of them. Hi I'm Nicole, guilty party of one here.
I don't paint my nails much anymore, which is sad because I can remember a time I painted my nails once to even twice a day!
I should probably stop this post right now and paint my nails...
But before I do I want to share with you guys a product I found from Sally Hansen that has helped me moisturize my dry cuticles and keep my nails, with or without polish, looking good.
Let me introduce you to Sally Hansen's Cuticle Rehab.
If my memory serves me correctly, since I've had this cuticle oil for a little while now, I got it at Walmart and its was somewhere around the $7 mark.
It says on the packaging that its a cuticle oil, but its in a gel form. I'm glad its a gel cuticle oil, so that way if I accidentally squeeze out too much it doesn't go all over the place. When you take the cap off it has a brush applicator so all you have to do is squeeze the tube and you can brush it on easily. I find that it works well so I can spread the oil all over the before I rub it in.
This stuff does have a scent to it but its not strong at all. I can't pinpoint what it smells like though, it smells to me like a standard cuticle oil, so if your not big on scents then you won't have a problem with this.
Anytime that I have applied this product, which is pretty much ever I do my nails, and once in a blue moon when I see my cuticles looking rough, I have seen an immediate result. It soaks in to both my nails and cuticles quickly and softens them so I can push back my cuticles. I have had other products in the past that did not work as quick or as well as this has.
Overall I think Sally Hansen's Cuticle Rehab is pretty awesome, my number one love about this product is how fast it works as I mentioned above. If you have hard to manage cuticles, whatever the case may be I would give this product a shot!
Have a great day and I'll talk to you next time!
Showing posts with label Sally Hansen. Show all posts
Wednesday, March 2, 2016
Wednesday, July 23, 2014
Sally Hansen Xtreme Wear Berry Juicy!
Hi lovelies! How have you all been! Are you ready for some nail polish? I am! Lets get to it.
Today I have to show you a new Sally Hansen Xtreme Wear Polish to show you. I believe this polish came out as part of the new core line for the Xtreme Wears. I found in a small end cap display at Wal-Mart with all the summer stuff.
I love the name of this polish. Its called Berry Juicy, its a pale pink but not a baby pink. It definitely has some brightness to it.
Berry Juicy is a creme formula, and you know how much I love my creme formulas. The formula itself is nice, its not thin or thick it falls nicely in the middle. If you do try to apply more than one coat without letting each layer dry it will get thick and nasty looking on the nail. Two coats will get you a nice opacity, thats what I used here in the photos.
This summer I am quite enjoy bright colors as usual so this is a no brainer favorite for me. It seems it will also be a good base for future nail art or stamping.
You can find Sally Hansen Xtreme Wear Polishes at drugstore or Mass retailer such as Wal-Mart or Target. I bought mine from Wal-Mart for $2.49 they were running a sale 2/$5 but $2.49 is the normal price!
Hope you guys enjoyed this quick post! I'll talk to you all soon! <3 Nicole
*Any products mentioned in this post were purchased by me and my own money. I am not being sponsered by any company mentioned. All opinions are my own.*
Today I have to show you a new Sally Hansen Xtreme Wear Polish to show you. I believe this polish came out as part of the new core line for the Xtreme Wears. I found in a small end cap display at Wal-Mart with all the summer stuff.
I love the name of this polish. Its called Berry Juicy, its a pale pink but not a baby pink. It definitely has some brightness to it.
Berry Juicy is a creme formula, and you know how much I love my creme formulas. The formula itself is nice, its not thin or thick it falls nicely in the middle. If you do try to apply more than one coat without letting each layer dry it will get thick and nasty looking on the nail. Two coats will get you a nice opacity, thats what I used here in the photos.
This summer I am quite enjoy bright colors as usual so this is a no brainer favorite for me. It seems it will also be a good base for future nail art or stamping.
You can find Sally Hansen Xtreme Wear Polishes at drugstore or Mass retailer such as Wal-Mart or Target. I bought mine from Wal-Mart for $2.49 they were running a sale 2/$5 but $2.49 is the normal price!
Hope you guys enjoyed this quick post! I'll talk to you all soon! <3 Nicole
*Any products mentioned in this post were purchased by me and my own money. I am not being sponsered by any company mentioned. All opinions are my own.*
Labels:
Pink,
Sally Hansen,
Summer,
Swatch,
Wal-Mart,
xtreme wear
Friday, January 3, 2014
Sally Hansen Insta Dry: Currant Trend.
Happy Friday lovelies!! I hope you all are going to have an amazing weekend. I will be working, as per usual. If you are snowed in like me I hope that you are safe and warm as well!
Today's polish is going to be one I picked up back in the mid fall, but is still available today. I saw them at Rite Aid not too long ago.
Sally Hansen really stepped up their game with polish last year. They put out some amazing glitters and Insta Drys! Today I have one of those Insta Drys to show you. Its called Currant Trend. I have never seen a currant but I am hoping its similar to this color.
Correction: I just Googled what a Currant is and its more red and burgundy then this polish color but this is still a beautiful polish.
Its such a vibrant purple!! I gravitate towards towards purple polishes and probably have way too many in my collection. You know the deal with the Insta Dry polishes, they dry fairly quickly, hence the name, and they come in these nifty bottles that are triangular shaped. They also have a large flat brush as well. The only thing I don't really like about the Insta Dry bottles is the neck of the bottle its so narrow and the wand and brush always come out full of polish so if you don't wipe it off well you still get a running flow of polish from the stem to the brush and you risk flooding your cuticles. As you can see I had that problem and my cuticles are slightly stained.
However with that one defect aside this color is beautiful. If look close you can see the individual blue and purple flecks that make this polish what it is. In real life in bottle it looks like a glass fleck but doesn't finish that way.
You can find Insta Dry polishes at your local drugstore, Wal-Mart, Target, etc.
Until next time.
<3 Nicole
Today's polish is going to be one I picked up back in the mid fall, but is still available today. I saw them at Rite Aid not too long ago.
Sally Hansen really stepped up their game with polish last year. They put out some amazing glitters and Insta Drys! Today I have one of those Insta Drys to show you. Its called Currant Trend. I have never seen a currant but I am hoping its similar to this color.
Correction: I just Googled what a Currant is and its more red and burgundy then this polish color but this is still a beautiful polish.
Its such a vibrant purple!! I gravitate towards towards purple polishes and probably have way too many in my collection. You know the deal with the Insta Dry polishes, they dry fairly quickly, hence the name, and they come in these nifty bottles that are triangular shaped. They also have a large flat brush as well. The only thing I don't really like about the Insta Dry bottles is the neck of the bottle its so narrow and the wand and brush always come out full of polish so if you don't wipe it off well you still get a running flow of polish from the stem to the brush and you risk flooding your cuticles. As you can see I had that problem and my cuticles are slightly stained.
However with that one defect aside this color is beautiful. If look close you can see the individual blue and purple flecks that make this polish what it is. In real life in bottle it looks like a glass fleck but doesn't finish that way.
You can find Insta Dry polishes at your local drugstore, Wal-Mart, Target, etc.
Until next time.
<3 Nicole
Saturday, July 20, 2013
45 Days Of Untrieds Day 9 Sally Hansen Lava.
Good Saturday evening polish friends! Hope your weekend is starting off wonderful! The heat wave has finally broke here in NY and its so nice not to be sweating like a fiend.
Today's Polish I think fits the bill of a heat wave, its Sally Hansen's Lava!
I purchased this polish when it first hit drugstores back I think sometime last year I think, but don't quote me.
This polish was part of a duo chrome collection and the only one I saw that I though would have potential. When buying duo chromes sometimes they can be very hit and miss. Lava however is a very big hit!
This polish upon first application is fairly sheer. If you are someone who just wants a wash of sparkle and color one coat should satisfy you. My mom is that way, but if you are like me and need to not see your VNL then it takes about three coats to make it the beautiful metallic color you see in the photo above.
With my hand in this position you see one of the color of this polish which is a bright hot pink. In the next photo below you see it shifts to a bright golden orange color.
Primarily when I look at the polish in real life it looks pink until you wiggle your fingers in the sun they they gorgeous orange shines through.
I believe this color is still available if you haven't picked it up yet or are considering it. Or maybe this post will sway you if you keep eyeing it when you go to the drugstore.
Do you like duo-chromes, do you own any??
Don't forget to check out Shaylads and Adrianna's untrieds today!!
<3 Nicole
Today's Polish I think fits the bill of a heat wave, its Sally Hansen's Lava!
I purchased this polish when it first hit drugstores back I think sometime last year I think, but don't quote me.
This polish was part of a duo chrome collection and the only one I saw that I though would have potential. When buying duo chromes sometimes they can be very hit and miss. Lava however is a very big hit!
This polish upon first application is fairly sheer. If you are someone who just wants a wash of sparkle and color one coat should satisfy you. My mom is that way, but if you are like me and need to not see your VNL then it takes about three coats to make it the beautiful metallic color you see in the photo above.
With my hand in this position you see one of the color of this polish which is a bright hot pink. In the next photo below you see it shifts to a bright golden orange color.
Primarily when I look at the polish in real life it looks pink until you wiggle your fingers in the sun they they gorgeous orange shines through.
I believe this color is still available if you haven't picked it up yet or are considering it. Or maybe this post will sway you if you keep eyeing it when you go to the drugstore.
Do you like duo-chromes, do you own any??
Don't forget to check out Shaylads and Adrianna's untrieds today!!
<3 Nicole
Tuesday, July 9, 2013
Julie G: Cabana Boy.
*Nothing to disclose, this polish was purchased by me and my own money.*
Hi guys! How are you all? I hope you had a good weekend, I went to a BBQ at my best friends house and ate way too much food and laughed a ton!
Today's post is a polish that has made its way into my favorites. I've showcased Julie G. polishes here on the blog before and this one is no exception.
I seriously hope Julie keeps making new polishes for her line because they are amazing. Cabana Boy is the name of the polish in today's post, and it is a bright cerulean blue creme, that reminds me a lot of Sally Hansen Pacific Blue and Nails Inc. Baker St.
This polish was released earlier this year as a part of the Julie G core collection.
The application of this polish is pretty much perfection. Two coats creates the perfect opacity, and the polish has a nice shine to it without top coat. This polish is too thin or too thick, it literally flows on to the nail and has easy control so you won't flood your cuticles. The only thing I found that I don't like but I think you will find this with any highly pigmented nail color is the fact it can stain your cuticles just a little.
Tell me what you guys think about the pictures! These were taken with my new camera! I got a Canon Rebel T3i for my birthday, all thanks to my parental units whom I love with all my heart and how they support my addiction to polish.
The three photos above were taken in natural cloudy light and all nails have top coat.
So tell me what is your favorite Julie G. Polish if you own any!
If you are looking for this amazing color its available at Rite Aid Pharmacies, and Jesse's Girl Cosmetics Website. Jesse's Girl helps create the Julie G. line!
Hi guys! How are you all? I hope you had a good weekend, I went to a BBQ at my best friends house and ate way too much food and laughed a ton!
Today's post is a polish that has made its way into my favorites. I've showcased Julie G. polishes here on the blog before and this one is no exception.
I seriously hope Julie keeps making new polishes for her line because they are amazing. Cabana Boy is the name of the polish in today's post, and it is a bright cerulean blue creme, that reminds me a lot of Sally Hansen Pacific Blue and Nails Inc. Baker St.
This polish was released earlier this year as a part of the Julie G core collection.
The application of this polish is pretty much perfection. Two coats creates the perfect opacity, and the polish has a nice shine to it without top coat. This polish is too thin or too thick, it literally flows on to the nail and has easy control so you won't flood your cuticles. The only thing I found that I don't like but I think you will find this with any highly pigmented nail color is the fact it can stain your cuticles just a little.
Tell me what you guys think about the pictures! These were taken with my new camera! I got a Canon Rebel T3i for my birthday, all thanks to my parental units whom I love with all my heart and how they support my addiction to polish.
The three photos above were taken in natural cloudy light and all nails have top coat.
So tell me what is your favorite Julie G. Polish if you own any!
If you are looking for this amazing color its available at Rite Aid Pharmacies, and Jesse's Girl Cosmetics Website. Jesse's Girl helps create the Julie G. line!
Labels:
Blue,
drugstore,
Julie G Collection,
JulieG,
Nails Inc,
Rite Aid,
Sally Hansen
Wednesday, June 12, 2013
Summer Leopard Nails. Rawr!
Hi guys!
Hope you all are well as always!
I don't usually do a ton a free hand nail art. If you saw Monday's post you know that, that nail art has been by far my best and favorite. The reason why I don't usually do free hand nail art is because I'm not really to good at it. In the beginning when I started blogging and doing nail art I was loving it and learning everyday and then I fell out of doing it so I've lost some skill, but I am slowly bringing it back to the surface and I hope more free hand nail art is in my future!
Back almost two week ago I was getting ready to see my bestest of friends in the world. She was going to pick me up for a dinner date and some girl time. I suddenly felt the need to gussy myself up in the 85 degree weather we were having. So as I did a whole face of make up and tried not to sweat it all off as I put it on, I decided I needed to do my nails as well and I wanted something bright and fun.
I originally was going to stamp some pretty little images on my nails but the stamper didn't feel like picking up the image so I was stuck. What to do? Then I thought why not free hand some leopard spots. I have seen it done loads of times from tons of my blogger friends, I practically had the tutorial burned into my brain. So I went to work.
I started out with a base color on all my nails except my ring finger and thumb of Fresh Paint (which is sold at Five Below) in Coconut. Coconut is a creamy off white color that is opaque in two coats, but the best thing about it, is that it has a peachy undertone to it so it doesn't look stark on your hands, its blends with my skin tone nicely. On my ring and thumb fingers I painted two coats of Sally Hansen Coral Reef, how come I have only just bought this color, I will never know. It is such a pretty bright corally pink.
Once my bases were dry I went to work on the spots. I took a toothpick and snipped off the end and filed it down to make a homemade dotting tool since mine had disappeared for the time being. I dipped it into Coconut and went about placing not too many random dots on my ring and thumb finger. Once that was done I took a fresh tooth pick and didn't snip the end off it and dipped it into some Wet 'n' Wild Black Crème polish and outlined my dots with some 'C' shapes and added a few tiny black dots to give it more dimension.
As you can see the second picture is of the famous "claw hand" so you can see my thumb.
All these photos were taken in natural light with no flash and yes there is a top coat on my nails. Coconut looks like it has more of a yellow undertone in the photos but I assure you in real life its more peachy. I am actually really proud of my nails here since it was the first time in months doing free hand. I got a few compliments on these nails and don't let the photo fool you these are nice and bright for the summer time.
If you want to get a hold of the Fresh Paint Polishes they are available at Five Below usually for 3/$5 or two bucks a piece I think. When I got Coconut they had quite a few bright pastel crèmes out, two of which will be on the blog later I am sure. You can get a hold of the Sally Hansen color Coral Reef wherever your Sally Hansen Polishes are sold. I got mine at Wal-Mart for I think $1.99.
I hope you enjoyed this nail art! What are some bright polishes or nail art you will be sporting this summer???
<3 Nicole
Hope you all are well as always!
I don't usually do a ton a free hand nail art. If you saw Monday's post you know that, that nail art has been by far my best and favorite. The reason why I don't usually do free hand nail art is because I'm not really to good at it. In the beginning when I started blogging and doing nail art I was loving it and learning everyday and then I fell out of doing it so I've lost some skill, but I am slowly bringing it back to the surface and I hope more free hand nail art is in my future!
Back almost two week ago I was getting ready to see my bestest of friends in the world. She was going to pick me up for a dinner date and some girl time. I suddenly felt the need to gussy myself up in the 85 degree weather we were having. So as I did a whole face of make up and tried not to sweat it all off as I put it on, I decided I needed to do my nails as well and I wanted something bright and fun.
I originally was going to stamp some pretty little images on my nails but the stamper didn't feel like picking up the image so I was stuck. What to do? Then I thought why not free hand some leopard spots. I have seen it done loads of times from tons of my blogger friends, I practically had the tutorial burned into my brain. So I went to work.
I started out with a base color on all my nails except my ring finger and thumb of Fresh Paint (which is sold at Five Below) in Coconut. Coconut is a creamy off white color that is opaque in two coats, but the best thing about it, is that it has a peachy undertone to it so it doesn't look stark on your hands, its blends with my skin tone nicely. On my ring and thumb fingers I painted two coats of Sally Hansen Coral Reef, how come I have only just bought this color, I will never know. It is such a pretty bright corally pink.
Once my bases were dry I went to work on the spots. I took a toothpick and snipped off the end and filed it down to make a homemade dotting tool since mine had disappeared for the time being. I dipped it into Coconut and went about placing not too many random dots on my ring and thumb finger. Once that was done I took a fresh tooth pick and didn't snip the end off it and dipped it into some Wet 'n' Wild Black Crème polish and outlined my dots with some 'C' shapes and added a few tiny black dots to give it more dimension.
As you can see the second picture is of the famous "claw hand" so you can see my thumb.
All these photos were taken in natural light with no flash and yes there is a top coat on my nails. Coconut looks like it has more of a yellow undertone in the photos but I assure you in real life its more peachy. I am actually really proud of my nails here since it was the first time in months doing free hand. I got a few compliments on these nails and don't let the photo fool you these are nice and bright for the summer time.
If you want to get a hold of the Fresh Paint Polishes they are available at Five Below usually for 3/$5 or two bucks a piece I think. When I got Coconut they had quite a few bright pastel crèmes out, two of which will be on the blog later I am sure. You can get a hold of the Sally Hansen color Coral Reef wherever your Sally Hansen Polishes are sold. I got mine at Wal-Mart for I think $1.99.
I hope you enjoyed this nail art! What are some bright polishes or nail art you will be sporting this summer???
<3 Nicole
Thursday, December 27, 2012
Christmas Mani Round up!
Hello!!!
Hope all of you lovely readers had an amazing Christmas! I know that I did! I am currently typing up this post from brand new desktop computer!!! I asked for one from Santa because I knew that I needed one. I had been using my mom's netbook for a while since she doesn't use it all that often but then it would get frustrating with the tiny mouse pad and very small screen. I would use my dad's computer but he would get mad about the pictures I had to upload to for the blog and how much space it took up even though I keep most of them on a USB drive.
So in todays post I am going to show you the two Christmas manicures that I wore the week of Christmas and on Christmas itself.
This holiday season I got back into nail art and had even purchased a new small set of brushes from Wal-Mart. They are the ones that one can use to paint on miniatures and dolls. My sister saw this and asked if I had a professional brush set and I told her no, so for Christmas she got me the Cheeky Beauty 26 piece professional brush set! I am absolutely in love with it! It even comes with two teeny tiny dotting tools.
Anyway these manicures were not made with those brushes, future ones will. The ones I bought at Wal-Mart. Ok so the first manicure is one that I wish I could of kept on all week long but it chipped way too much and I had to take it off.
The first design was inspired by the YouTuber CutePolish. I watched several of her Christmas tutorials from this year and last year and went at it. I did a mix of nail art, I had Santa's coat on one finger, elves on other and six reindeer, including Rudolph!
If you want to see her tutorials for all these awesome designs for next Christmas then go to her YouTube page and check them out!
The polishes that I used to create these fun designs:
Santa's Coat: China Glaze Cranberry Splash, Sinful Colors Black Striper, Pure Ice Superstar, and Sally Hansen Golden-I.
The Elves: China Glaze Jolly Holly, Sinful Colors Black Striper and Sally Hansen Golden-I.
The Reindeer: China Glaze Foie Gras, OPI Crepe Susizette, Pure Ice Superstar and Sinful Black Striper. (For Rudolph's nose I dotted Cranberry Splash instead of black. )
Please excuse the chip wear and the horrid cuticles!! I took these photos a day or so after work.
I really enjoyed this manicure I think it got the most attention out of the two! A lot of people liked the reindeer especially.
For my second manicure that I wore and actually wore on Christmas was inspired by an organza bag that we had with all the Christmas stuff. It was gold with gold paisley. There was no way I could recreate it so I decided to take a red base and recreate the gold swirls.
Using once again Cranberry Splash as my base color I waited for it to dry and proceeded to paint on my swirls. Using my tiniest brush from the Wal-Mart pack I got I gently drew the swirls with a very light hand. I definitely thought that less is more with this so I didn't take the swirls to far.
Now that I have my new brush set I think I will be trying these nails again in different color combos!
I hope you all enjoyed this Christmas post! Next up will be my picks from the Top 10 polishes of 2012! I have had that list running in my head since about October! I can't wait to share it with you guys soon!!
Talk to you all very soon!
Nicole
Hope all of you lovely readers had an amazing Christmas! I know that I did! I am currently typing up this post from brand new desktop computer!!! I asked for one from Santa because I knew that I needed one. I had been using my mom's netbook for a while since she doesn't use it all that often but then it would get frustrating with the tiny mouse pad and very small screen. I would use my dad's computer but he would get mad about the pictures I had to upload to for the blog and how much space it took up even though I keep most of them on a USB drive.
So in todays post I am going to show you the two Christmas manicures that I wore the week of Christmas and on Christmas itself.
This holiday season I got back into nail art and had even purchased a new small set of brushes from Wal-Mart. They are the ones that one can use to paint on miniatures and dolls. My sister saw this and asked if I had a professional brush set and I told her no, so for Christmas she got me the Cheeky Beauty 26 piece professional brush set! I am absolutely in love with it! It even comes with two teeny tiny dotting tools.
Anyway these manicures were not made with those brushes, future ones will. The ones I bought at Wal-Mart. Ok so the first manicure is one that I wish I could of kept on all week long but it chipped way too much and I had to take it off.
The first design was inspired by the YouTuber CutePolish. I watched several of her Christmas tutorials from this year and last year and went at it. I did a mix of nail art, I had Santa's coat on one finger, elves on other and six reindeer, including Rudolph!
If you want to see her tutorials for all these awesome designs for next Christmas then go to her YouTube page and check them out!
The polishes that I used to create these fun designs:
Santa's Coat: China Glaze Cranberry Splash, Sinful Colors Black Striper, Pure Ice Superstar, and Sally Hansen Golden-I.
The Elves: China Glaze Jolly Holly, Sinful Colors Black Striper and Sally Hansen Golden-I.
The Reindeer: China Glaze Foie Gras, OPI Crepe Susizette, Pure Ice Superstar and Sinful Black Striper. (For Rudolph's nose I dotted Cranberry Splash instead of black. )
Please excuse the chip wear and the horrid cuticles!! I took these photos a day or so after work.
I really enjoyed this manicure I think it got the most attention out of the two! A lot of people liked the reindeer especially.
For my second manicure that I wore and actually wore on Christmas was inspired by an organza bag that we had with all the Christmas stuff. It was gold with gold paisley. There was no way I could recreate it so I decided to take a red base and recreate the gold swirls.
Using once again Cranberry Splash as my base color I waited for it to dry and proceeded to paint on my swirls. Using my tiniest brush from the Wal-Mart pack I got I gently drew the swirls with a very light hand. I definitely thought that less is more with this so I didn't take the swirls to far.
Now that I have my new brush set I think I will be trying these nails again in different color combos!
I hope you all enjoyed this Christmas post! Next up will be my picks from the Top 10 polishes of 2012! I have had that list running in my head since about October! I can't wait to share it with you guys soon!!
Talk to you all very soon!
Nicole
Saturday, December 1, 2012
A very simple holiday manicure!
Hello my dears!
Hope you all are having a wonderful Sunday! Today I am picking my dad up from the train station! I'm excited to see him I haven't seen him since before Thanksgiving.
Another thing that has happened is we have had our first snowfall this year!! It's only like a half inch but still it's snow! Sadly it will be gone by Tuesday as they are forecasting it to be 60 degrees! Such weird weather for December and New York!
Since it is December and the holidays are approaching I bring you the first holiday manicure! Anyone can do this manicure it so simple you can't mess it up!
First up you start with a gold foil polish! I used Sally Hansen Golden-I which I just bought and can't believe I never owned it! Plus gold polishes are all over this time a year, there are a few companies that have them out this year. Two coats and your at optimal opaqueness. Let that dry completely, then add one to two coats of your favorite multi color glitter! Who doesn't want to be all sparkly this time of year??
I would suggest if your multicolored glitter is densely packed then only use one coat if its a very sparse glitter like the one I used which was the Blue Cross Beauty Holiday Lights use two coats. The bottle actually lights up different colors!
Add your favorite top coat and you are good to go! I got a lot of compliments at work on this manicure, it's so simple and festive that it would go good would any holiday party and outfit!
Check out the photos below!! I hope you enjoyed this post and stay tuned for more holiday manicures and treats!
Hope you all are having a wonderful Sunday! Today I am picking my dad up from the train station! I'm excited to see him I haven't seen him since before Thanksgiving.
Another thing that has happened is we have had our first snowfall this year!! It's only like a half inch but still it's snow! Sadly it will be gone by Tuesday as they are forecasting it to be 60 degrees! Such weird weather for December and New York!
Since it is December and the holidays are approaching I bring you the first holiday manicure! Anyone can do this manicure it so simple you can't mess it up!
First up you start with a gold foil polish! I used Sally Hansen Golden-I which I just bought and can't believe I never owned it! Plus gold polishes are all over this time a year, there are a few companies that have them out this year. Two coats and your at optimal opaqueness. Let that dry completely, then add one to two coats of your favorite multi color glitter! Who doesn't want to be all sparkly this time of year??
I would suggest if your multicolored glitter is densely packed then only use one coat if its a very sparse glitter like the one I used which was the Blue Cross Beauty Holiday Lights use two coats. The bottle actually lights up different colors!
Add your favorite top coat and you are good to go! I got a lot of compliments at work on this manicure, it's so simple and festive that it would go good would any holiday party and outfit!
Check out the photos below!! I hope you enjoyed this post and stay tuned for more holiday manicures and treats!
Thursday, October 18, 2012
Pure Ice Superstar. My go-to white polish!
Hello! Happy Thursday! I hope you all are well!
Today I am going to show you my go-to white polish! This is the polish I use as my base for all my gradients, attempts at watermarbles, some stamping and just to have as a good clean canvas!
I have tried many white polishes since becoming addicted to nail polish, my very first white polish I tried was Sally Hansen Insta Dry Polish in Whirlwind White. I had purchased it based on a YouTuber that I religiously watch and she had said it was her favorite white so I decided to give it a try. For the most part it is a great white polish. I'm not a fan of the brushes, but that's another debate or blog post in its entirety. By the time I got down to the last 1/3 of the bottle the polish began to get goopy and thick and just not usable anymore. Plus at that time I had no idea to go out and purchase polish thinner and make it like brand new.
The second white polish that I have tried is Sally Hansen Extreme Wear Polish in White on. White on is another great white creme polish but is a tad streaky, especially if you didn't have enough on the brush to cover your whole nail in a couple of swipes. I don't know if it was maybe the batch of polishes or if they were just really old sitting on the shelf but I felt White on got more goopy even when the bottle was almost full .
The third white polish I purchased was yet another Sally Hansen polish that was from the Hard As Nails Collection, and I can't remember the name of. This was the worst white polish by far that I ever purchased. To talk about streaky was an understatement, it took like four coats to be opaque and even then it wasn't really even and dry time was horrendous. Once again I was in search of a new white polish.
Now I could of purchased Sinful Colors Snow Me White, but no one around me had it in stock at the time, but then I saw that Pure Ice, which is typically sold at Walmart had a creme white polish called Superstar. I decided to try it, for a little over a dollar it was totally worth to give it a shot, Sometimes the cheapest polishes can be the best.
Boy did I find a winner with Superstar! If you are careful you can make this a one coater, other wise two coats is perfect. I have actually purchased two bottles of this so far, and my first bottle isn't even gone yet! My first bottle is down to the last third and its not even goopy or thick!
Here are a few swatch photos of Superstar!
Clean up with Superstar can be either good or bad. Usually I can get my cuticles clean and nice, sometimes it just doesn't happen. For my pick for favorite white polish Pure Ice Superstar is the winner!
Have a great Thursday guys!
<3 Nicole
Today I am going to show you my go-to white polish! This is the polish I use as my base for all my gradients, attempts at watermarbles, some stamping and just to have as a good clean canvas!
I have tried many white polishes since becoming addicted to nail polish, my very first white polish I tried was Sally Hansen Insta Dry Polish in Whirlwind White. I had purchased it based on a YouTuber that I religiously watch and she had said it was her favorite white so I decided to give it a try. For the most part it is a great white polish. I'm not a fan of the brushes, but that's another debate or blog post in its entirety. By the time I got down to the last 1/3 of the bottle the polish began to get goopy and thick and just not usable anymore. Plus at that time I had no idea to go out and purchase polish thinner and make it like brand new.
The second white polish that I have tried is Sally Hansen Extreme Wear Polish in White on. White on is another great white creme polish but is a tad streaky, especially if you didn't have enough on the brush to cover your whole nail in a couple of swipes. I don't know if it was maybe the batch of polishes or if they were just really old sitting on the shelf but I felt White on got more goopy even when the bottle was almost full .
The third white polish I purchased was yet another Sally Hansen polish that was from the Hard As Nails Collection, and I can't remember the name of. This was the worst white polish by far that I ever purchased. To talk about streaky was an understatement, it took like four coats to be opaque and even then it wasn't really even and dry time was horrendous. Once again I was in search of a new white polish.
Now I could of purchased Sinful Colors Snow Me White, but no one around me had it in stock at the time, but then I saw that Pure Ice, which is typically sold at Walmart had a creme white polish called Superstar. I decided to try it, for a little over a dollar it was totally worth to give it a shot, Sometimes the cheapest polishes can be the best.
Boy did I find a winner with Superstar! If you are careful you can make this a one coater, other wise two coats is perfect. I have actually purchased two bottles of this so far, and my first bottle isn't even gone yet! My first bottle is down to the last third and its not even goopy or thick!
Here are a few swatch photos of Superstar!
Clean up with Superstar can be either good or bad. Usually I can get my cuticles clean and nice, sometimes it just doesn't happen. For my pick for favorite white polish Pure Ice Superstar is the winner!
Have a great Thursday guys!
<3 Nicole
Labels:
Extreme wear,
Hard as nails,
Insta-Dry,
polish,
Pure Ice,
Sally Hansen,
Superstar,
White
Tuesday, October 16, 2012
Breast Cancer Manicure!
Hello! How are you all? I'm doing okay on my end, lots of stuff going on as this fall season gets going, parties, visiting with my new niece and my work load at my job has picked up more since we are a man down in the office until further notice. I have been pulling six to seven day shifts in a row. Sadly they are not in the same pay period so no extra money to be had in my wallet :(
These six-seven day stretches really wear me out and by the time I have a spare minute blogging is not the first thing that comes to mind, although I have been taking pictures of manicures that I've done and some swatches, so now that I actually have a spare minute I'm trying to get a few post pre-published to help me out. I feel like I've been in a slump lately with blogging since work is killing me, but with the Holiday seasons creeping up on us I want to get back in the game.
And the way to get back into the game is to post my Breast Cancer Awareness manicure that I did back a couple weeks ago for a fundraiser my supervisor started two years ago!
I don't personally have anyone in my family who suffers from Breast Cancer or any Cancer for that matter, thank god but I do know people at my job outside my job that includes customers and even friends of fellow bloggers who have had to battle this awful disease.
So for this manicure I used the most appropriate polishes I could find/owned and that was the OPI Breast Cancer Duo, and last years Essie Breast Cancer polishes.
I started out with two coats of Zoya Flora, a nice dusty pink color that would help contrast the nail art I wanted to create. Flora is a lovely pink polish that like with most pastel pinks is a little streaky on first coat but by the second coat its pretty opaque. It has this almost jelly like finish two it but its more on the creme side. It dries kind of dull so a top coat is needed to wake it up.
Then on my left hand I created a pink ribbon using Essie's Raise Awareness, with the small end of a dotting tool. On my right hand I couldn't re-create the pink ribbon so I took the Glitter from the OPI Duo and covered my ring finger in about three coats of it over flora!
Essie Raise Awareness is probably my favorite pastel pink that I own, its not streaky at all and its just a fun girly pink color. The Glitter from the OPI Duo, (which the name escapes me) but I think its You Glitter Be Good To Me, is pale pink round glitter with darker pink small hex glitter mixed in. You can wear this glitter by itself with about three coats for full coverage, but just remember how much a pain in the butt glitter is to remove! Unless you use the foil method of course!
Now these pictures were taken after a day of wear so please forgive me for the slight tip wear. My coat has been a mix of Orly Sec n Dry and Sally Hansen Insta Dry. My Base is Orly Bonder. I Hope you enjoyed this post and stay tuned for more.
<3 Nicole
These six-seven day stretches really wear me out and by the time I have a spare minute blogging is not the first thing that comes to mind, although I have been taking pictures of manicures that I've done and some swatches, so now that I actually have a spare minute I'm trying to get a few post pre-published to help me out. I feel like I've been in a slump lately with blogging since work is killing me, but with the Holiday seasons creeping up on us I want to get back in the game.
And the way to get back into the game is to post my Breast Cancer Awareness manicure that I did back a couple weeks ago for a fundraiser my supervisor started two years ago!
I don't personally have anyone in my family who suffers from Breast Cancer or any Cancer for that matter, thank god but I do know people at my job outside my job that includes customers and even friends of fellow bloggers who have had to battle this awful disease.
So for this manicure I used the most appropriate polishes I could find/owned and that was the OPI Breast Cancer Duo, and last years Essie Breast Cancer polishes.
I started out with two coats of Zoya Flora, a nice dusty pink color that would help contrast the nail art I wanted to create. Flora is a lovely pink polish that like with most pastel pinks is a little streaky on first coat but by the second coat its pretty opaque. It has this almost jelly like finish two it but its more on the creme side. It dries kind of dull so a top coat is needed to wake it up.
Then on my left hand I created a pink ribbon using Essie's Raise Awareness, with the small end of a dotting tool. On my right hand I couldn't re-create the pink ribbon so I took the Glitter from the OPI Duo and covered my ring finger in about three coats of it over flora!
Essie Raise Awareness is probably my favorite pastel pink that I own, its not streaky at all and its just a fun girly pink color. The Glitter from the OPI Duo, (which the name escapes me) but I think its You Glitter Be Good To Me, is pale pink round glitter with darker pink small hex glitter mixed in. You can wear this glitter by itself with about three coats for full coverage, but just remember how much a pain in the butt glitter is to remove! Unless you use the foil method of course!
![]() |
| With Flash |
![]() |
| In The Natural sunlight, this was taken in the early am. |
![]() |
| My right hand with flash |
<3 Nicole
Thursday, September 20, 2012
China Glaze: I'm Not Lion
Hey guys! Hope you all are fabulous!!!
I have been doing well, some awesome things are happening in my life! My best friend Stephanie, who has been my BFF for the last 7 years just had her first baby! Gianna Nicole, yes Stephanie was awesome and gave her daughter my name as her middle name! I was so excited when she told me she was pregnant! This was the first time I have had anyone close to me have a kid so I couldn't wait to be involved! Since Steph and I are like sisters I got to go to one of the sonograms and see baby Gianna, and I got to help with the baby shower! When Gianna was born I got to go the day after and see her and I got to hold her! Holding a one day old baby is amazing she so tiny and squishy! I can't wait to see her grow up and learn to talk and call me aunt pumpernickel (yeah that's my nickname)!
The other awesome thing happening in my life right now is that I am about to make my final credit card debt payment this week! Its taken me about a year to pay it off! Don't get me wrong I make sure all bills that need to be paid are paid first before I go out and buy anything such as clothing, make up or nail polish.
So anyway after sharing that awesome news with you guys, its time to show you my manicure! I finally decided to wear a glitter polish I bought back on my birthday in July. Today I have China Glaze's I'm not Lion!
This is a pale gold glitter that is finely milled and packed with some holographic bits as well! It is so pretty in the bottle and on the nail! You can wear this polish on its own like I am in this post or you can layer it over black or any dark color to make it pop!
Two coats is more than enough for opacity alone, it does dry very gritty. It's the one thing I hate most about glitter polishes and the fact they eat top costs like crazy! I love when a glitter dries smooth they are few and far between but they'd do exist!
OK so on to the pictures!
The first picture is with a flash and no top coat. The second picture is no flash with two coats of top coat (Sally Hansen Insta Dry) and the last picture is a blurry shot to see the sparkly-ness of I'm Not Lion.
I'm Not Lion is one of the glitters from the On Safari Collection from China Glaze and should still be available online through places like Head2Toe Beauty, Transdesign, and Victoria Nail Supply. Prices may vary by E-tailer. I purchased my polish at Sally's Beauty Supply when they had the collection.
Okay so I hoped you enjoyed that and I will have a new post soon! I have an idea in the works but it's not properly thought out yet :)
OK talk to you all soon :)
I have been doing well, some awesome things are happening in my life! My best friend Stephanie, who has been my BFF for the last 7 years just had her first baby! Gianna Nicole, yes Stephanie was awesome and gave her daughter my name as her middle name! I was so excited when she told me she was pregnant! This was the first time I have had anyone close to me have a kid so I couldn't wait to be involved! Since Steph and I are like sisters I got to go to one of the sonograms and see baby Gianna, and I got to help with the baby shower! When Gianna was born I got to go the day after and see her and I got to hold her! Holding a one day old baby is amazing she so tiny and squishy! I can't wait to see her grow up and learn to talk and call me aunt pumpernickel (yeah that's my nickname)!
The other awesome thing happening in my life right now is that I am about to make my final credit card debt payment this week! Its taken me about a year to pay it off! Don't get me wrong I make sure all bills that need to be paid are paid first before I go out and buy anything such as clothing, make up or nail polish.
So anyway after sharing that awesome news with you guys, its time to show you my manicure! I finally decided to wear a glitter polish I bought back on my birthday in July. Today I have China Glaze's I'm not Lion!
This is a pale gold glitter that is finely milled and packed with some holographic bits as well! It is so pretty in the bottle and on the nail! You can wear this polish on its own like I am in this post or you can layer it over black or any dark color to make it pop!
Two coats is more than enough for opacity alone, it does dry very gritty. It's the one thing I hate most about glitter polishes and the fact they eat top costs like crazy! I love when a glitter dries smooth they are few and far between but they'd do exist!
OK so on to the pictures!
I'm Not Lion is one of the glitters from the On Safari Collection from China Glaze and should still be available online through places like Head2Toe Beauty, Transdesign, and Victoria Nail Supply. Prices may vary by E-tailer. I purchased my polish at Sally's Beauty Supply when they had the collection.
Okay so I hoped you enjoyed that and I will have a new post soon! I have an idea in the works but it's not properly thought out yet :)
OK talk to you all soon :)
Labels:
China Glaze,
Glitter,
Gold,
I'm Not Lion,
Insta-Dry,
On Safari,
Sally Hansen,
Summer
Thursday, September 6, 2012
Sally Hansen Lacquer Shine Nail Color : Dazzling
Happy Thursday to you all!
Wow it's been a little while since my last post! Life's just been quite busy, between work and personal life!
Today I bring you a polish that I got for a steal! I went into the Dollar Tree as I do about once ever couple of weeks to see what new polishes they may have gotten in and low and behold I find six colors from Sally Hansen I've never seen before!
These lacquers are technically vintage since when I researched them they were originally released in 2007! They are called Sally Hansen Lacquer Shine Nail Color! Out of the six colors I grabbed five. The sixth color just wasnt me :(
The first color in the collection I'm going to feature here on the blog is called Dazzling! Dazzling is a brilliant ruby red color! All of the polishes in this line are jewel tones which as we know are big for fall this year!
Application was fairly easy. The brushes on these polishes are the thin standard polish brush not the the thicker versions we see nowadays. Although part of me really likes those brushes for some reason. I feel I have better control over my brush strokes.
Two coats is perfect opacity. Dry time is normal for a Sally Hansen, usually by the five minute mark it's dry to the touch and you put your top coat on no problem. Pairing this polish with the Insta-Dry top coat really makes this gem shine.
For one measly dollar and 8 eight cents plus tax each I think they are rather worth it. Check out the pictures below!
Do the bottles look familiar to you? When comparing them to other Sally Hansen polish bottles I noticed Sally Hansen re-issued these bottles with the HD polishes, top and all except the HD tops are silver and these are black, the Gem Crush Collection also has the same style bottles. Personally I like the bottles they are easy to hold for photos.
Wow it's been a little while since my last post! Life's just been quite busy, between work and personal life!
Today I bring you a polish that I got for a steal! I went into the Dollar Tree as I do about once ever couple of weeks to see what new polishes they may have gotten in and low and behold I find six colors from Sally Hansen I've never seen before!
These lacquers are technically vintage since when I researched them they were originally released in 2007! They are called Sally Hansen Lacquer Shine Nail Color! Out of the six colors I grabbed five. The sixth color just wasnt me :(
The first color in the collection I'm going to feature here on the blog is called Dazzling! Dazzling is a brilliant ruby red color! All of the polishes in this line are jewel tones which as we know are big for fall this year!
Application was fairly easy. The brushes on these polishes are the thin standard polish brush not the the thicker versions we see nowadays. Although part of me really likes those brushes for some reason. I feel I have better control over my brush strokes.
Two coats is perfect opacity. Dry time is normal for a Sally Hansen, usually by the five minute mark it's dry to the touch and you put your top coat on no problem. Pairing this polish with the Insta-Dry top coat really makes this gem shine.
For one measly dollar and 8 eight cents plus tax each I think they are rather worth it. Check out the pictures below!
Do the bottles look familiar to you? When comparing them to other Sally Hansen polish bottles I noticed Sally Hansen re-issued these bottles with the HD polishes, top and all except the HD tops are silver and these are black, the Gem Crush Collection also has the same style bottles. Personally I like the bottles they are easy to hold for photos.
Labels:
2007,
Dazzling,
Lacquer shine,
red,
Sally Hansen,
vintage
Monday, August 27, 2012
Sally Hansen Insta Dry Polish: Bronze Ablaze
Hello! Hope you all are having a lovely night/evening.
Tonight I am going to bring you a polish that I had in my polish drawer from last fall! I totally forgot about it and since fall is almost around the corner I thought it would be good to give it a 'test run'.
Usually I usher in fall when Bath and Body Works starts breaking out the fall stuff and Dunkin Donuts start selling Pumpkin Coffee! Usually it's around this time!
First up is Bronze Ablaze. I first heard about this polish when Nouveau Cheap had posted about it. It was part of a Sally Hansen Limited Edition Collection that had a bunch of other jewel tone polishes in it, including Ruby Rush, which will be the next post!
Bronze Ablaze's application is like any other Insta Dry polish. The brush is bulky and you get nice even coats but its a little messy. The color is gorgeous! In different light you see a kind of olive green color to a nice antiqued gold color. I think this is going to be one of the go to colors for fall for me! I have nothing like this in my collection!
Drying time is pretty okay with these, I only used to own Whirlwind white and that dried super fast! Plus adding the Insta Dry Top Coat just brings out the shimmery goodness!
Let's take a look at the picture!
Tonight I am going to bring you a polish that I had in my polish drawer from last fall! I totally forgot about it and since fall is almost around the corner I thought it would be good to give it a 'test run'.
Usually I usher in fall when Bath and Body Works starts breaking out the fall stuff and Dunkin Donuts start selling Pumpkin Coffee! Usually it's around this time!
First up is Bronze Ablaze. I first heard about this polish when Nouveau Cheap had posted about it. It was part of a Sally Hansen Limited Edition Collection that had a bunch of other jewel tone polishes in it, including Ruby Rush, which will be the next post!
Bronze Ablaze's application is like any other Insta Dry polish. The brush is bulky and you get nice even coats but its a little messy. The color is gorgeous! In different light you see a kind of olive green color to a nice antiqued gold color. I think this is going to be one of the go to colors for fall for me! I have nothing like this in my collection!
Drying time is pretty okay with these, I only used to own Whirlwind white and that dried super fast! Plus adding the Insta Dry Top Coat just brings out the shimmery goodness!
Let's take a look at the picture!
Labels:
Bronze Ablaze,
Dollar Tree,
Fall,
Insta-Dry,
Sally Hansen
Friday, May 18, 2012
SNAAARKM Challenge Day 3: Dotting Tool
Hello! So today is day three of the SNAAARKM Challenge! It means its dotting tool day!
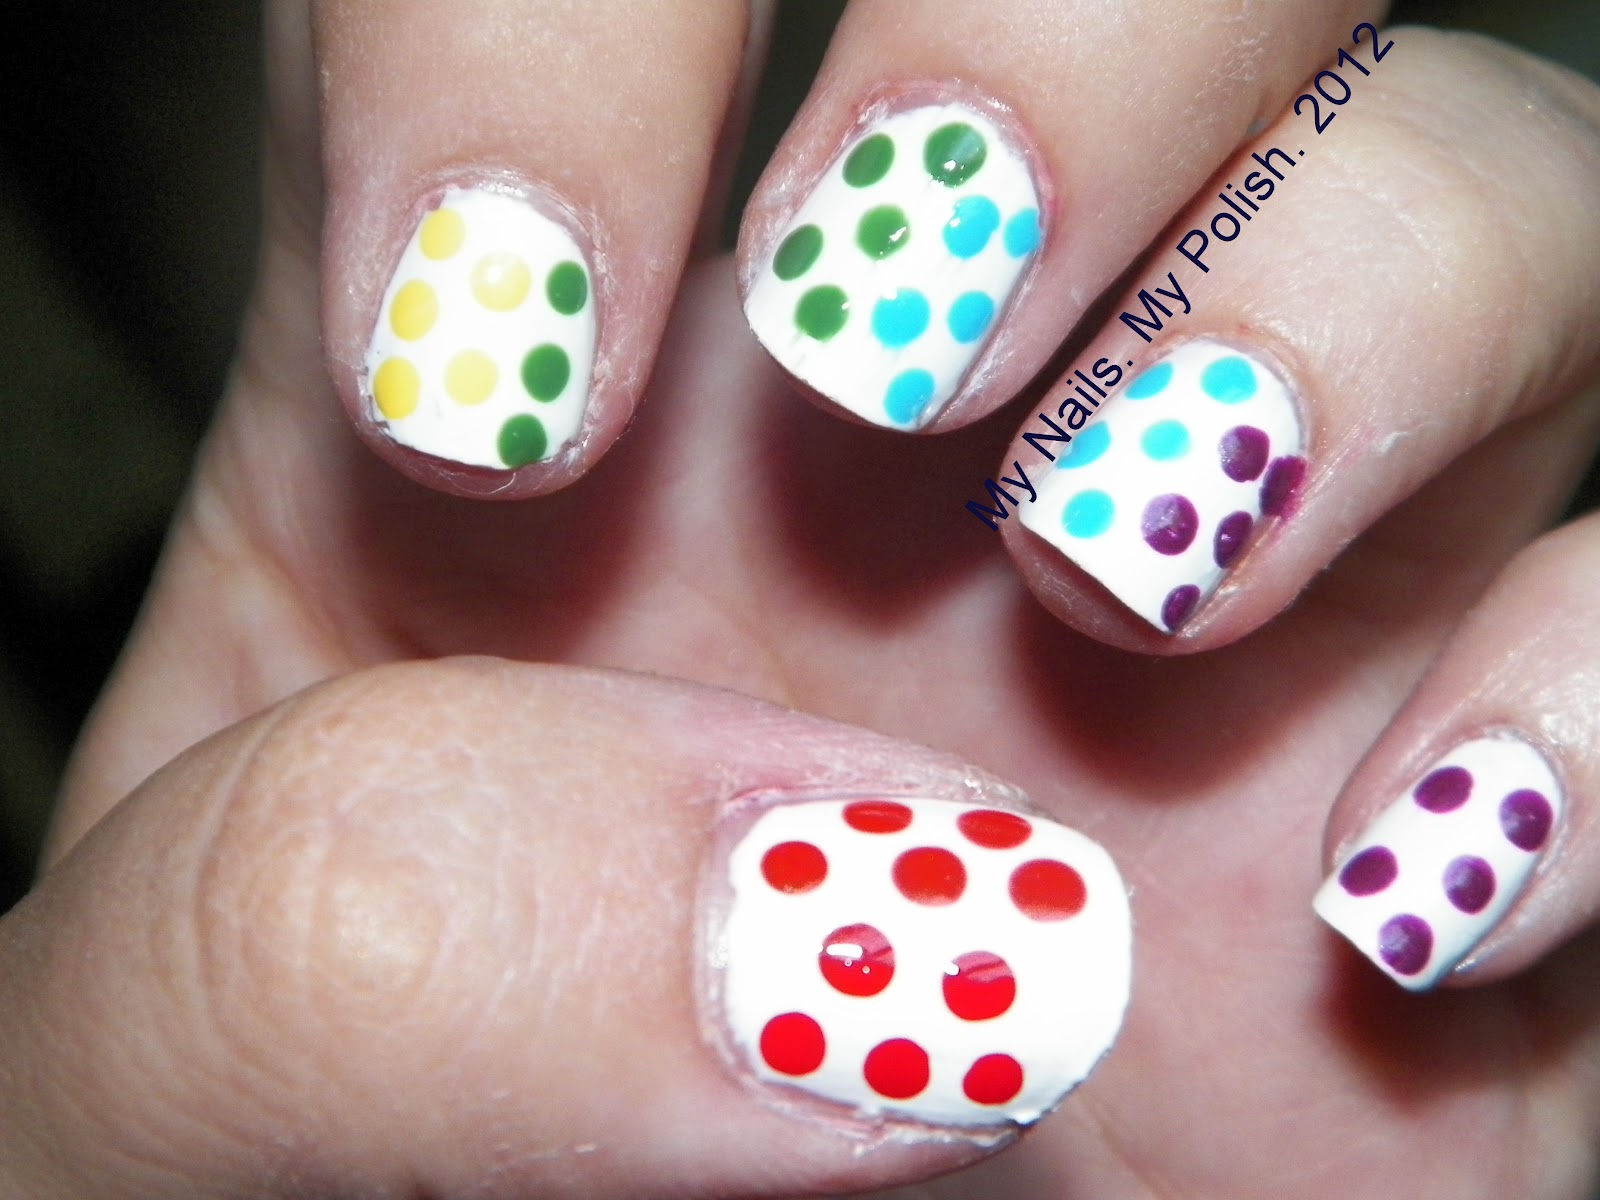
I don't own any dotting tools....I use toothpicks with the ends snipped off, but its the same thing practically! You can still make beautiful dots with them! That's what I attempted to do here.
I had this fantastic idea in my head and thought when I translate this to my nails then its gonna be friggen awesome! Yeah its more of meh to me. It didn't come out the way I saw it in my head, but hey do they ever??
For the dots I used the whole rainbow! Really I did, look!
I know you can't tell the orange from the red on my thumb nail, :(. Here is a list of the polishes I used.
Base color: Pure Ice Superstar
Red: Jessie's Girl Wham Bam
Orange: Sally Hansen Crushed
Yellow: Hard Candy Splendid
Green: China Glaze Starboard
Blue: Simply Sweet Blue
Purple: L.A. Colors Striper in Purple.
I wanted it to be like the candy dots you see but with the rainbow effect! This took me back to the 31 Day Challenge when it was Rainbow Day!
Here is a little better of a picture. I think my dots weren't spaced out right or something but I still semi liked it.
Don't forget the other awesome ladies who are doing this challenge! Don't forget to follow us on Twitter too!
Ryan- Dream A Little Dream Of Polish
Alaina- The Little Canvas
Megan- Let There Be Lacquer
Ave- Polish Pixelle
Amanda- Fashion Footing
Kristen- In The Name Of Polish
Stephanie- Sincerely Stephanie
Until next time!
Nicole
I don't own any dotting tools....I use toothpicks with the ends snipped off, but its the same thing practically! You can still make beautiful dots with them! That's what I attempted to do here.
I had this fantastic idea in my head and thought when I translate this to my nails then its gonna be friggen awesome! Yeah its more of meh to me. It didn't come out the way I saw it in my head, but hey do they ever??
For the dots I used the whole rainbow! Really I did, look!
I know you can't tell the orange from the red on my thumb nail, :(. Here is a list of the polishes I used.
Base color: Pure Ice Superstar
Red: Jessie's Girl Wham Bam
Orange: Sally Hansen Crushed
Yellow: Hard Candy Splendid
Green: China Glaze Starboard
Blue: Simply Sweet Blue
Purple: L.A. Colors Striper in Purple.
I wanted it to be like the candy dots you see but with the rainbow effect! This took me back to the 31 Day Challenge when it was Rainbow Day!
Here is a little better of a picture. I think my dots weren't spaced out right or something but I still semi liked it.
Don't forget the other awesome ladies who are doing this challenge! Don't forget to follow us on Twitter too!
Ryan- Dream A Little Dream Of Polish
Alaina- The Little Canvas
Megan- Let There Be Lacquer
Ave- Polish Pixelle
Amanda- Fashion Footing
Kristen- In The Name Of Polish
Stephanie- Sincerely Stephanie
Until next time!
Nicole
Wednesday, May 16, 2012
SNAAARKM Challenge. Day 2: A classic manicure.
Okay, I don't know about you but when I saw this as the second day challenge the first thing that popped into my head was a french manicure. Its classic, I did it for Valentines day and it worked well. Right now though, with my three nubs it was a no go for sure.
Then I tried to rack my brain on what to do right before this challenge went live. A gradient manicure. It popped in my head right after the first day to do it for today. I questioned myself on whether it could be dubbed a 'classic' but when I see one I think its definitely going to be a future classic! So why not start saying it now.
So I bring you my very first attempt at a sponged gradient manicure. Staying with the pink theme of Monday's manicure here's what I came up with.
I started off with my usually undergarments of OPI Natural Nail Strengthener and a ridge filling base coat I got from Sally's. Then I painted three coats of Queen Cupcake from Funky Fingers.
After letting it dry thoroughly I sponged on some of QC mixed with Sinful Colors Pink Forever and Milani Pink Hottie Neon. Then I topped it off with Sally Hansen Insta Dry Top Coat, ( actually like two coats) sponging does make the mani a little bumpy!
I definitely need to work on my sponging skills but I'm pretty happy with they way this turned out. My best friend today at work grabbed my hands asking me how I did this!
I hope you all are happy with this too! I can't wait to see what the other girls come up with.
Check them out! Click the links below!
Alaina - The Little Canvas
Ryan- Dream A Little Dream Of Polish
Stephanie- Sincerely Stephanie
Ave- Polish Pixelle
Kristen- In The Name Of Polish
Amanda- Fashion Footing
Megan - Let There Be Lacquer
Then I tried to rack my brain on what to do right before this challenge went live. A gradient manicure. It popped in my head right after the first day to do it for today. I questioned myself on whether it could be dubbed a 'classic' but when I see one I think its definitely going to be a future classic! So why not start saying it now.
So I bring you my very first attempt at a sponged gradient manicure. Staying with the pink theme of Monday's manicure here's what I came up with.
I started off with my usually undergarments of OPI Natural Nail Strengthener and a ridge filling base coat I got from Sally's. Then I painted three coats of Queen Cupcake from Funky Fingers.
After letting it dry thoroughly I sponged on some of QC mixed with Sinful Colors Pink Forever and Milani Pink Hottie Neon. Then I topped it off with Sally Hansen Insta Dry Top Coat, ( actually like two coats) sponging does make the mani a little bumpy!
I definitely need to work on my sponging skills but I'm pretty happy with they way this turned out. My best friend today at work grabbed my hands asking me how I did this!
I hope you all are happy with this too! I can't wait to see what the other girls come up with.
Check them out! Click the links below!
Alaina - The Little Canvas
Ryan- Dream A Little Dream Of Polish
Stephanie- Sincerely Stephanie
Ave- Polish Pixelle
Kristen- In The Name Of Polish
Amanda- Fashion Footing
Megan - Let There Be Lacquer
Friday, April 13, 2012
Zoya Savita
Hello! Happy Friday to everyone! Hope you all are having a fabulous Friday!
Today I have a manicure I did over Easter weekend. Its what I wore on Easter and was supposed to post it on Easter as well, sadly the holiday got in the way and I didn't have time to get to the computer! I do hope you all had a lovely Easter too!
My untrieds are starting to generate more and more, I think right now I have about 25 or so if I were to go and look right now. I purchased two Zoya Polishes for the first time back in January when they had the get two free polishes and just pay shipping. That promo was good, so many people participated that my polishes didn't get to me until the end of January!
From that promo I got Zoya Savita and Zoya Flora! I have used Zoya Flora in the 31 Day Challenge. I plan on doing a full post about Zoya Flora soon. Today though I have Zoya Savita, to share. It is a matte polish, my first one actually! Mattes are growing on me more and more, I actually just bought a couple more from different brands over the last couple of months,
Savita is a matte purple , Zoya has it labeled on their bottles as a Matte Velvet Lacquer.
I'm surprised I never wore any purple matte before! I do love this polish in its natural form. However with the way matte polishes chip so easily because obvious use of top coat would defeat the purpose!
Here is Savita with a top coat. I had no idea Savita had a ton of pink/orangish shimmer in it!
Of course I couldn't leave it like that. Lately I have been about stamping, so I added some silver daises with Sally Hansen Celeb City.
In each photo Zoya Savita is two coats although with a little thicker coat one could be just fine! The formula is really easy and isn't runny at all and allows for the optimum control!
Zoya Polishes can be found on Zoya's website and I believe at Ulta as well! Hope you all enjoyed this ! Talk to you all soon.
Nicole
Today I have a manicure I did over Easter weekend. Its what I wore on Easter and was supposed to post it on Easter as well, sadly the holiday got in the way and I didn't have time to get to the computer! I do hope you all had a lovely Easter too!
My untrieds are starting to generate more and more, I think right now I have about 25 or so if I were to go and look right now. I purchased two Zoya Polishes for the first time back in January when they had the get two free polishes and just pay shipping. That promo was good, so many people participated that my polishes didn't get to me until the end of January!
From that promo I got Zoya Savita and Zoya Flora! I have used Zoya Flora in the 31 Day Challenge. I plan on doing a full post about Zoya Flora soon. Today though I have Zoya Savita, to share. It is a matte polish, my first one actually! Mattes are growing on me more and more, I actually just bought a couple more from different brands over the last couple of months,
Savita is a matte purple , Zoya has it labeled on their bottles as a Matte Velvet Lacquer.
I'm surprised I never wore any purple matte before! I do love this polish in its natural form. However with the way matte polishes chip so easily because obvious use of top coat would defeat the purpose!
Here is Savita with a top coat. I had no idea Savita had a ton of pink/orangish shimmer in it!
Of course I couldn't leave it like that. Lately I have been about stamping, so I added some silver daises with Sally Hansen Celeb City.
In each photo Zoya Savita is two coats although with a little thicker coat one could be just fine! The formula is really easy and isn't runny at all and allows for the optimum control!
Zoya Polishes can be found on Zoya's website and I believe at Ulta as well! Hope you all enjoyed this ! Talk to you all soon.
Nicole
Labels:
Matte,
Purple,
Sally Hansen,
Salon Express Kit,
Savita,
Zoya
Saturday, April 7, 2012
Easter Water Marble
Hello! Happy almost Easter everyone!
Today I am going to bring you an Easter Water Marble that I can say I like and don't like.
I have been soo busy with work that I haven't had the time to actually think of stuff to do on my nails for Easter. I do have some bunny nail art that I am going to post tomorrow!
Every year when I was a kid my family would color Easter eggs. All the kids would get around the table at my aunts and have at it. I even remember my dad would get in on it and actually poke a holes in a raw egg and blow out the yolk so you would just have shell and it would be like a piece of art.
This water marble is inspired by that. I took Sally Hansen's Hard To get, a nice white creme polish and painted my nails the standard two coats to make the perfect canvas. Then I used the following polishes in no particular order create the marbling effect.
So I hope you like them! You know the only thing I wish for was a way to make water marbling less messy. I did use tape to help prevent clean up but I still had a lot to clean :(
Today I am going to bring you an Easter Water Marble that I can say I like and don't like.
I have been soo busy with work that I haven't had the time to actually think of stuff to do on my nails for Easter. I do have some bunny nail art that I am going to post tomorrow!
Every year when I was a kid my family would color Easter eggs. All the kids would get around the table at my aunts and have at it. I even remember my dad would get in on it and actually poke a holes in a raw egg and blow out the yolk so you would just have shell and it would be like a piece of art.
This water marble is inspired by that. I took Sally Hansen's Hard To get, a nice white creme polish and painted my nails the standard two coats to make the perfect canvas. Then I used the following polishes in no particular order create the marbling effect.
- Simply Sweet Blue
- Simply Sweet Baby Pink
- Sally Hansen ( a lilac purple I can't remember the name of)
- Milani 3D Holographic Polishes in Cyberspace, Hi-Res, and Digital.
So I hope you like them! You know the only thing I wish for was a way to make water marbling less messy. I did use tape to help prevent clean up but I still had a lot to clean :(
These are all taken in sunlight from my window. I do like the idea of water marbling, I just think I need more practice. Maybe that will be a goal to set out this weekend or something, practice water marbling!.
Okay so stay tuned for a Easter bunny manicure for tomorrow!
Nicole.
Labels:
Baby Pink,
Blue,
Cyberspace,
Digital,
Hi-Res.,
Milani,
Sally Hansen,
Simply Sweet
Subscribe to:
Posts (Atom)